What a disaster!
White Horse CAD has a reputation for solving problems, no matter how big or small. So when we got home after a long day to find the only bottle opener was missing, we had to solve the problem using some of our usual tools.
Let’s look at some possible solutions, we could…
- Bite the top off the bottle as you see in the films…
That’s got to hurt, there is a very high chance of causing damage to ourselves… let’s keep looking for solutions. - Force the top off by placing it over a worktop and hitting the top of the bottle downwards
This could work, but I have a feeling pushing a hard serrated metal edge into our immaculate worktop is going to cause some damage. And, causing this will most likely result in me feeling some type of pain, most likely financial, and possibly physical injury. My partner is very protective of her kitchen. - Ask a neighbor for help
The trouble is, I think it was their bottle opener that’s gone missing, we borrowed it a few years ago. - Buy a new bottle opener
The shops are shut, and I could really do with a cold beer…
Ok, we’re going to have to think outside of the box to solve this little problem… Let’s ponder what we have to hand that could solve the problem…
-

- SolidWorks

-
- 3D Printer

Things are looking up because we have SolidWorks. It’s one of the best pieces of design software on the market. Plus one of the best desktop 3D printers available. These two tools with over 30 years of engineering experience and over 15 years design experience could help us solve the problem of liberating some beer from its glassy tomb.
Lets get designing…
Fast work is needed to finish this project before dehydration sets in. The opener needs to be functional, look good and not take an age to 3D print. A simple design it is then!

Simple 3D design using SolidWorks
Here we have a simple design with a single feature. This reduces the time by keeping the design intent simple. The trouble is it looks a little ugly and there is too much material that will make printing longer.

Now it’s starting to take shape. We have taken out at least 30% of the mass. But those edges still look a little unfriendly, so let’s try to make the whole thing a little more comfortable to hold.

With smooth lines this design is virtually complete but there’s time to add branding.

Add identity and branding to a product
There we go, a design that didn’t take too long. Now to 3D print this little lifesaver!
Preparing for 3D Printing
Luckily file preparation is as simple as saving the file in another format. Then using the 3D printer software to create a printable file.
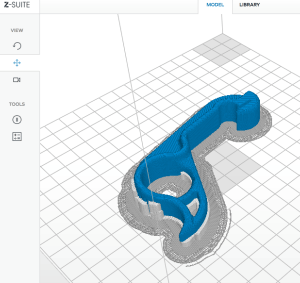
Hoorah – our bottle opener design is done and ready to print. Using the default settings and a 0.2mm layer height to ensure the print would be as quick as possible. It takes about an hour, so some time to relax, whilst the bottle opener is printing.


You must be logged in to post a comment.